
Learning how to shave with a safety razor is easy if you follow the right steps. When first starting out shaving with a safety razor, it can be a bit overwhelming trying to figure out what all is required to wet shave.
Lots of new terminology, equipment, and the nagging fear that you are missing something.
This is a basic shaving routine from start to finish so you can learn how to shave your face. It would be impossible to list every variation for each of the steps, so here we’ll just cover the essentials.
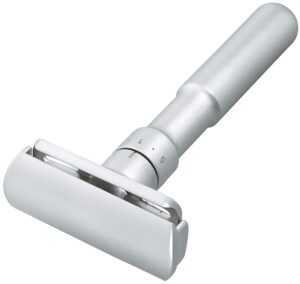
Choose Your Safety Razor
Choosing the best safety razor is easy with our expert guide.
Hopefully you are already well aware of the benefits of shaving with a safety razor. You’ll have a much better quality shave if you follow these steps. Plus you’ll save a fortune compared to a lifetime of using plastic catridge razors. You’ll also save the planet a little too – even back in 1990 the EPA reported the US threw away 2 billion plastic disposable razors.
How To Shave With a Safety Razor – Preparation
Soaking Brush
Fill the sink or a shaving mug with hot water and leave your shaving brush to soak. This can be done in an old coffee cup, the sink, or your shaving bowl. Still need a shaving brush? Read our top picks here.
You also need to prime your shaving soap – here are our favourites. If you are using a hard shaving soap place a little water on top of the soap and let it sit to soften it up.
This is referred to as “blooming” your soap. This hydrates the soap and allows it to load the brush easier. If you are using a cream shaving soap this is not required.
Select your razor and make sure it’s ready. If you are using a safety razor give it a quick once over and replace the blade if needed.
Our gear is ready to go, so lets take care of ourselves now. One of the most common ways to prep your beard is to take a shower. The act of taking a shower preps your beard by stripping the natural oils from your beard (allowing water to penetrate the follicles) and hydrating your beard making it easier to cut.
What is also nice about this method is that it allows your shaving brush and shaving soap to soak in the water while you are showering. However, see our debate on whether to shave before or after shower.
Hot Towel
If you don’t have time for a shower you can use the hot towel method or a pre shave oil. Take a hand towel or kitchen towel and place it in the sink and douse it with the hottest water you can get. Some people will put them in the microwave for a short burst to really heat it up.
Place this towel over your beard and hold it there. If it’s too hot to do that you can also move it across your face carefully in a sweeping motion downwards. The heat and water will soften the hair follicles and clean the oil, dirt, and dead skin cells off of your face.
Shaving oil is another option that is often used as a preparatory step.
Another unusual variation of the towel method is to lather your face, place the towel on top of the lather and let the towel do its thing. You then wipe the lather off with the towel. You would then re-lather for your shave.
This is particularly nice if you have a shaving soap with beneficial properties for your skin. Many people use variations of the shower, towel, shave oil, and pre lather prep routine. Mix and match to your hearts content.
At this point your beard is primed and ready to go. Time to whip up a bowl full of creamy lather goodness.
Shaving Brush And Soap
Take your shaving brush out of its container and discard the soaking water. Hold your brush over the sink and give the bristles one good squeeze to get rid of excess moisture. Do not squeeze it more than that or flick it to get rid of more water. You need that water to create lather so make sure the shaving brush is wet but not dripping.
One reason shaving soap offers a better shaving experience is because of this process of brushing the skin, opening and cleaning pores as well as softening bristles and exfoliating the skin. Can you shave with regular soap? Of course – but you miss out on a more luxurious experience.
Place the shaving brush bristles in the soap and apply just enough pressure to cause the bristles to splay out slightly. Too much pressure and you risk damaging the bristles, to little and you will not be able to properly load the shaving brush.
Whirl the shaving brush around the shaving bowl your shaving soap comes in to build up a rich lather. Don’t apply too much pressure and also consider adding more hot water until you get the right foamy consistency.
Swirl the brush back and forth in a clockwise/counter-clockwise motion for a full 30 seconds.
After 30 seconds the top of your brush should be fully coated in soap and the tips should be starting to clump together a bit. You may see what looks like an early form of lather forming as well. If you don’t see this then you can try loading the brush for another 10 or 15 seconds.
Creating the Shaving Soap Lather
Before you start whipping your brush around you need to decide how you are going to work up a lather:
Using a Shaving Bowl to Lather:
While there are many types of shaving bowls to lather in, we will assume you have something on hand that will work.
Place the brush in the bowl so that the knot begins to splay (spread out at the end) just a little bit. You want a bit of pressure to create friction, but not so much that you are damaging the brush.
Start to move the brush in circles around the inside of the bowl in a vigorous manner. Do this for 30 seconds.
Now we add a little bit of hot water. One of the most common problems is using too much water in a shaving soap. Turn your faucet to the lowest setting you can get it to while having a continuous stream of water. Take your brush and quickly pass the ends of it through the stream of water… that’s all the water you need for now.
Perform another 30 seconds of bowl lathering. You will start to see the lather building up and perhaps spilling out the top of your bowl. This is fine and normal.
You can push it back in and incorporate it into your lather or can flick it into the sink to get it out of the way. I like to work it back in myself, but it doesn’t make a huge difference in the end.
It’s hard to say how many lathering cycles you will need to perform. The variables of shaving brushes, water quality, bowl, and technique make it impossible to predict. Some people like thick creamy lather, some like it thin and slick.
When you hit that magic ratio of water to soap the lather will feel like it is exploding from the brush and bowl. The lather will acquire a slight sheen to it and feel very slick when rubbed between your fingers.
Many bowl latherers enjoy using badger hair shaving brushes and brushes with longer handles to keep the lather off of their hands.
Face lathering
An alternative to creating lather in a bowl is to simply use your face. Many aspects of face lathering are similar to bowl lathering but simpler and faster, albeit with the difficulty of gravity.
Turn your faucet on to the lowest setting you can get it to while having a continuous stream of water. Take your brush and quickly pass the end of it through the stream of water… that’s all the water you need for now.
Put your brush down and splash water on your face. Don’t skimp on this step as this will be a majority of the water you will be working into your lather.
Immediately take your brush and apply it to your face with enough pressure to splay the ends of the knot a bit, but not enough to damage the bristles. Starting at your sideburn area start swirling the brush in small tight circles.
While swirling the brush begin to move it down your face toward your chin. Work the brush over your neck and the other side of your face as well.
Once you face lather a bit you can control the rate of water introduced into the brush by how fast you “chase” the water that is running down your face.
As gravity pulls the water down your face there is going to be less water on your cheeks and more water on your chin and neck area.
Keep lathering until you have used the available water on your face. Wet your shaving brush as stated above and work it into your face again.
At this point you may need a little more water or you may be good to go. While face lathering works up a great lather on your face, it is meant to work up a great lather in your brush. Remember you have to perform one or two more passes with you razor after this one so you want a brush that is well loaded up with lather.
Face latherers usually prefer a boar bristle brush as it is a bit stiffer.
This technique is a great way to exfoliate your beard area. This can help with razor bumps, ingrown hairs, and acne.
Palm Lathering
This is a perfectly valid technique, just not one that is used as often. The palm of your hand is used as the friction surface instead of a bowl or your face.
To palm lather, cup your off hand into a large “C” shape. Use this as a modified shaving bowl and lather as per the shaving bowl procedure above
Palm lathering is messier than bowl or face lathering but also presents some distinct advantages. There is no bowl or scuttle to deal with, and you get great feedback on the quality of your lather.
Many people use palm lathering to master a new shaving soap, break in a new shaving brush, or to practice lathering when they have a few spare minutes.
Palm lather is often recommended for lathering heavy creams as they often end up being swirled around the perimeter of a bowl and not load into a brush.
Applying Lather Ready to Shave Your Face
You should now have a shaving brush loaded with a creamy, slick, frothy goodness known as shaving lather. Unfortunately, you are only half way there. While making the lather is part of what a shaving brush is for, it’s application to the face is just as crucial.
The act of applying the lather with your shaving brush breaks free your hair follicles and surrounds them with lather. This suspends them off of your face, making it easier for your razor to perform its job. All we have to do now is apply the lather to our face… unless you are a face latherer and already have a goodly amount on your mug.
First off, splash some water onto your face. Remember that this is called wet shaving for a reason. Take your shaving brush and apply it to your face. Use just enough pressure to cause the end of the brush to splay out a little.
Using a tight circular motion proceed to apply lather to your face. There are many methods used to apply lather. Every thing from a swirling motion, painting strokes, to dabbing motions or anything else you can imagine. As long as you work the lather into your skin and apply enough lather to provide good cushion (for you face latherers, now is when you would perform one or two last gentle passes to ensure you have lather to shave with).
How To Shave With A Safety Razor
Perform Your First Pass
Time for your first pass as you learn how to shave with a safety razor. In this pass we are going to shave with the grain (WTG).
As for how to shave with a safety razor, hold your safety razor at about a 30 – 40 degree angle to the skin and shave using no more force than the weight of the razor in your grip. You should feel the blade removing the bristles but if not you can adjust your angle.
One way to find the right angle for a safety razor is to hold the safety razor with the top of the head flat against your face and move the razor until your can feel it cutting the bristles.
Work with small strokes of about an inch or two, rinsing the razor between strokes. You can use your other hand to stretch the skin you are shaving.
Start up at your side burns and cheeks and work towards your chin and nose. You can use either hand and can switch hands as needed. Then proceed to your neck and work from one side to another.
Use your free hand to stretch the skin when needed. This is particularly helpful on your neck, chin, and jawline.
While shaving make sure and remember to use light pressure. You are not trying to remove all of the hair in one pass, pressure is the number one cause of a painful shave.
Shaving the chin can be problematic due to its shape. This can be helped by using even smaller strokes to shave each angle, again with the grain.
Now that you first pass is done, rinse your face with water and apply more lather. If your lather is a bit week you can add a drizzle of water to the brush and work it on your face to refresh your lather. Time for your second pass as you continue mastering how to shave with a safety razor.
When done give your razor a quick rinse and set it aside. It’s now time to re-lather for your next pass. Splash some water on your face and take a second to run your hands over the areas you just shaved. Evaluate what is left and splash some more water on your face. Take your shaving brush and lather your face again.
Due to the bulk of your beard being removed on the first pass (WTG) it is often recommended to build a thicker, more formidable lather on your face for greater lubricating properties.
I am going to assume that you know the direction of growth of your beard. If not, take a minute and run your hand over your face and note which way the hair lays. This can change on different parts of your face. This is an essential bit of knowledge to successfully wet shave.
Shaving Across the Grain
In this pass we are going to shave across the grain (XTG). Once again start on one side of your face and work to the other. If you can’t perform a true XTG pass due to the way your hair grows then get it as close as possible.
At this point in time many people will rinses their face, feel for any spots they missed, perform a touch up on those spots and call it a day. There is nothing wrong with this and you will have great shave.
Some people with particularly tough beards will perform another XTG pass going from the other direction to knock down their beards before attempting anything more.
Shaving Against The Grain
If you are seeking the ultimate shave as you learn how to shave with a safety razor then we go for the against the grain pass (ATG).
Wet your face again and re-lather. Proceed to shave against the grain. Be aware that the razor will feel like it is “grabbing” a little bit more. This is normal for an ATG pass.
Use very small strokes of the razor, if you try for long strokes of your razor you may cause the razor to “skip”. Make sure and use very light pressure as this is the pass that can cause the most irritation. This can be particularly difficult pass to perform on your upper lip.
Rinse your face with water and run your hands over your recently shorn face. Congratulations on a job well done. Take a minute and feel your face to see if you missed anything. If you missed anything you can perform a quick touch up of the area. Don’t overdo it as this increases your chances of causing razor burn.
How to Shave With a Safety Razor – Aftershave
You have now successfully prepared for and executed your shave and hopefully have a good idea of how to shave with a safety razor. Now we will be taking a few minutes to take care of our equipment and pamper our skin. First off, make sure and rinse off all of the shaving cream from your face. While your face is still wet take a slightly wet alum block and run it over the area you shaved.
This serves three purposes. It is an astringent that will help stop any weepers, it is an antiseptic which will help kill any bacteria on your face, and it will sting ever so slightly when you run it over an area of your face that you scraped raw.
This stinging is an excellent way to judge your shave. It shows where you are using too much pressure, bad razor angle, too many passes or a combination of the three.
If you prefer the astringent and antiseptic benefits but don’t want the stinging then try some witch hazel. Another option is to use a favorite aftershave or talcum powder.
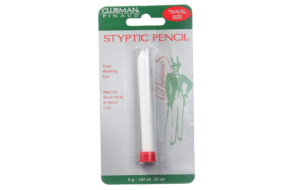
Before we take care of your equipment, check to see if you nicked yourself and are bleeding. Cutting yourself is not uncommon when learning to wet shave. If the cold water and alum did not stop the bleeding then try a touch of toilet paper and some pressure. A styptic pencil works as well.
Caring For Your Shaving Brush
While leaving the witch hazel or alum on your face take a moment and rinse out your shaving brush. Work all of the lather out of the brush until the water runs clear. Squeeze the bristles to release the water and shake the brush to get any loose water out. Many brush aficionados then dry the bristles on a towel with a painting motion and run a comb through the bristles before putting the brush up to dry.
Clean Up Your Safety Razor
For the safety razor users, thoroughly rinse out the razor to remove any lather and hair residue. You may need to remove the safety razor blade to ensure you get it all. Many people will dip the razor in isopropyl alcohol and then let it dry. This drives any water left in the razor out of the nooks and crannies and kills any bacteria that may be present.
For the straight razor users, use a clean bit of T.P. or cloth to thoroughly dry the razor off. Strop the razor 10 to 20 laps to ensure the edge is completely dry. Store in a dry environment. Some people will put a drop of oil on the blade as a rust preventative and/or use isopropyl alcohol to disinfect the blade.
Rinse out your shaving bowl/mug and put it up. Close up your shaving soap and put it away.
Rinse your face to get rid of the alum. At this point you can apply a cologne, lotion, or balm to your skin. Take a second and wipe down the sink area.
Congratulate yourself on learning how to shave with a safety razor.


